지난 포스팅에서는 스테이지에 대한 기본 세팅까지 완료하였다.
이제 1 스테이지 전체에 대한 구성을 해 보도록 하자.

이렇게 위와 같이 스테이지 1을 구성 해 보았다.
스테이지는 무조건 길게 구성하는 것이 아닌, 다양한 종류의 기믹 발판들을 구성 하는 것을 목표로 하였다.
발판 종류는 다음과 같다.
1. 일반 발판

일반적인 발판이다.
2. 움직이는 발판

움직이는 발판이다.
코드가 아닌, 애니메이션 효과를 통하여 움직이게 하였다.

장점은 간단하게 움직임을 구현할 수 있지만, 단점은 위치를 변경하면 세팅을 다시 해 주어야 한다는 점이다.
이에 다음 스테이지에서는 코드를 통해 구현 해 보고자 한다.
3. 통통 튀기는 발판

말 그대로 통통 튀기는 발판이다.
Physic Material 에서 Bounce 수치를 1로 설정 한 다음, Bounce Combine을 Maximum으로 설정 해 주면 잘 튕기게 된다.
4. 크기가 늘었다가 줄었다가 하는 발판

처음에는 사라졌다 생기는 발판으로 만들려고 하였으나 애니메이션에서 Collision 을 on/off 해 주는 기능이 있음을 보고 기획을 바꾸어서 설정하였다.

위 사진을 보게 되면 작아지고 있는 어느 시점에서 Collider를 off 해 주게 되었다.
반대로 특정 크기 이상이 되면 다시 on을 해 주었다.

또한, 당장은 타이밍을 잡기 쉽겠지만 타이밍을 잡기 싫어하는 사람들을 위해 다른 루트의 길도 마련하였다.
+ 세이브 포인트

발판은 아니지만 세이브 포인트도 마련하였다.
세이브 포인트에 닿게 되면 Player에서 복귀 하는 좌표를 바꾸어 주는 식으로 구현하였다.
Player.cs 코드
using System.Collections;
using System.Collections.Generic;
using UnityEngine;

public class Player : MonoBehaviour
{
    GameObject manager;
    Managing managing;
    Rigidbody rigid;

    bool isJumpState = false;
    // bool SavePointOneEnabled = false;

    Vector3 ReturnPos = new Vector3(1,1,-18); // 세이브 포인트를 먹지 않았을 때
    float jumpForce = 60.0f;

    // Start is called before the first frame update
    void Start()
    {
        rigid = GetComponent();

        manager = GameObject.FindGameObjectWithTag("Manager");
        managing = manager.GetComponent();

    }

    private void Update()
    {
        if (Input.GetButtonDown("Jump") && !isJumpState)
        {
            isJumpState = true;
            rigid.AddForce(Vector3.up * jumpForce, ForceMode.Impulse);
        }

    }


    // Update is called once per frame
    void FixedUpdate()
    {
        float h = Input.GetAxisRaw("Horizontal");
        float v = Input.GetAxisRaw("Vertical");

        rigid.AddForce(new Vector3(h, 0, v), ForceMode.Impulse);

    }

    private void OnCollisionEnter(Collision collision)
    {
        if(collision.gameObject.tag == "base")
        {
            isJumpState = false;
        }
        else if(collision.gameObject.tag == "under")
        {
            rigid.velocity = Vector3.zero;
            managing.MoveToTarget(ReturnPos);

        }

    }

    private void OnTriggerEnter(Collider other)
    {
        if(other.gameObject.tag == "SavePoint")
        {
            ReturnPos = other.gameObject.transform.position; // 돌아 갈 지점 갱신
            other.gameObject.SetActive(false); // 세이브 포인트를 먹었으니 비활성화
        }

    }

}
처음에 기획했던 생각 중에서 발판 색깔 별로 기능을 구분하는 것도 있었다.
따라서 듀토리얼의 역할을 하는 1 스테이지에서는 UI를 통하여 발판에 대한 안내가 이루어져야 한다.
이에 UI 세팅을 해 보고자 한다.
UI는 기본적으로 Panel에 text를 자식으로 넣어서 노출시키고자 한다.
그리고 Panel을 비활성화 시켜 둔 다음, 특정 Trigger를 지나가게 되면 활성화를 시켜주면 될 것이다.

위 그림처럼 빈 오브젝트에 Box Collider를 만들어 세팅 해 준다.
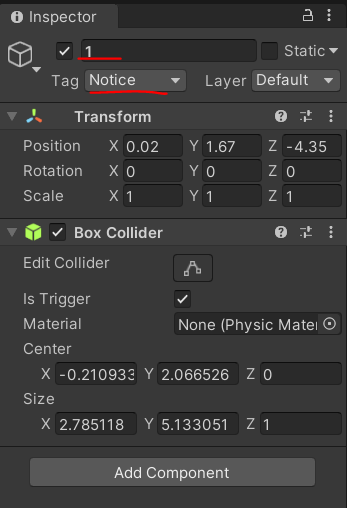
Tag를 Notice, 이름은 숫자로 설정 해 준다.
그리고 Player.cs 코드를 아래와 같이 변경시켜 준다.
핵심은 무한정으로 UI가 뜨지 않게 하기 위해 이미 본 UI면 체크를 해 줄 필요가 있다.
using System.Collections;
using System.Collections.Generic;
using UnityEngine;

public class Player : MonoBehaviour
{
    GameObject manager;
    Managing managing;
    Rigidbody rigid;

    bool isJumpState = false;
    // bool SavePointOneEnabled = false;

    Vector3 ReturnPos = new Vector3(1,1,-18); // 세이브 포인트를 먹지 않았을 때
    float jumpForce = 60.0f;

    int showNotice = 0;

    // Start is called before the first frame update
    void Start()
    {
        rigid = GetComponent();

        manager = GameObject.FindGameObjectWithTag("Manager");
        managing = manager.GetComponent();

    }

    private void Update()
    {
        if (Input.GetButtonDown("Jump") && !isJumpState)
        {
            isJumpState = true;
            rigid.AddForce(Vector3.up * jumpForce, ForceMode.Impulse);
        }

    }


    // Update is called once per frame
    void FixedUpdate()
    {
        float h = Input.GetAxisRaw("Horizontal");
        float v = Input.GetAxisRaw("Vertical");

        rigid.AddForce(new Vector3(h, 0, v), ForceMode.Impulse);

    }

    private void OnCollisionEnter(Collision collision)
    {
        if(collision.gameObject.tag == "base")
        {
            isJumpState = false;
        }
        else if(collision.gameObject.tag == "under")
        {
            rigid.velocity = Vector3.zero;
            managing.MoveToTarget(ReturnPos);

        }

    }

    private void OnTriggerEnter(Collider other)
    {
        if(other.gameObject.tag == "SavePoint")
        {
            ReturnPos = other.gameObject.transform.position;
            other.gameObject.SetActive(false); // 세이브 포인트를 먹었으니 비활성화
        }

        if(other.gameObject.tag == "Notice")
        {
            if(other.gameObject.name == "1" && showNotice < 1)
            {
                managing.ShowNotices(1);
                showNotice++;
            }
            else if(other.gameObject.name == "2" && showNotice < 2)
            {
                managing.ShowNotices(2);
                showNotice++;
            }
            else if (other.gameObject.name == "3" && showNotice < 3)
            {
                managing.ShowNotices(3);
                showNotice++;
            }
            else if (other.gameObject.name == "4" && showNotice < 4)
            {
                managing.ShowNotices(4);
                showNotice++;
            }
            else if (other.gameObject.name == "5" && showNotice < 5)
            {
                managing.ShowNotices(5);
                showNotice++;
            }
            else if (other.gameObject.name == "6" && showNotice < 6)
            {
                managing.ShowNotices(6);
                showNotice++;
            }

        }

    }

}
이에 showNotice를 만들어서 순차적으로 설명을 볼 수록 1씩 가산 해 주었다.
(차라리 다시 송출되지 않는 조건에 맞는 숫자를 대입하는 것도 될 것 같다. - 첫 번째 UI를 보면 1로 대입)
Managing.cs 코드도 수정 해 준다.
using System.Collections;
using System.Collections.Generic;
using UnityEngine;
using UnityEngine.UI;

public class Managing : MonoBehaviour
{
    GameObject player;
    Vector3 startPos;

    public Text noticeText;
    public GameObject panel; // 판넬
    float onTime = 0f;
    float delTime = 3.0f;
    bool isOn;

    // Start is called before the first frame update
    void Start()
    {
        player = GameObject.FindGameObjectWithTag("Player");
        startPos = player.transform.position;
    }

    // Update is called once per frame
    void Update()
    {
        if (isOn)
        {
            onTime += Time.deltaTime;
            if(onTime > delTime)
            {
                panel.SetActive(false);
                isOn = false;
                onTime = 0f;
            }

        }
    }

    public void MoveToTarget(Vector3 target)
    {
        // 플레이어를 타겟으로 이동시키는 함수
        player.transform.position = target;
    }

    public void ShowNotices(int num)
    {
        switch (num)
        {
            case 1:
                panel.SetActive(true); // 첫 번째는 내용 변화가 X
                if (!isOn) // UI가 사라진 상태에서 UI 생성 시
                {
                    isOn = true;
                }
                else
                {
                    onTime = 0f;
                }

                break;
            case 2:
                panel.SetActive(true);
                if (!isOn) // UI가 사라진 상태에서 UI 생성 시
                {
                    isOn = true;
                }
                else
                {
                    onTime = 0f;
                }
                noticeText.text = "바닥에 떨어지면 처음 위치로 돌아갑니다!";
                break;
            case 3:
                panel.SetActive(true);
                if (!isOn) // UI가 사라진 상태에서 UI 생성 시
                {
                    isOn = true;
                }
                else
                {
                    onTime = 0f;
                }
                noticeText.text = "방금 먹은 노란색 꼬깔은 세이브 포인트에요!\n 바닥에 떨어지면 세이브 포인트로 복귀한답니다!";
                break;
            case 4:
                panel.SetActive(true);
                if (!isOn) // UI가 사라진 상태에서 UI 생성 시
                {
                    isOn = true;
                }
                else
                {
                    onTime = 0f;
                }
                noticeText.text = "전방에 움직이는 파란 색 발판이 보이나요?\n 튕겨 나가지 않게 조심하세요!";
                break;
            case 5:
                panel.SetActive(true);
                if (!isOn) // UI가 사라진 상태에서 UI 생성 시
                {
                    isOn = true;
                }
                else
                {
                    onTime = 0f;
                }
                noticeText.text = "전방에 보라색 발판이 보이나요?\n 통! 통! 튀기면서 저 멀리 하늘 위로 올라가 봐요!";
                break;
            case 6:
                panel.SetActive(true);
                if (!isOn) // UI가 사라진 상태에서 UI 생성 시
                {
                    isOn = true;
                }
                else
                {
                    onTime = 0f;
                }
                noticeText.text = "앞에 노란색 발판은 크기가 줄었다가 늘었다가 하네요!\n 세이브 포인트도 먹었겠다 한번 도전 해 볼래요?\n 싫으면 오른쪽으로 돌아서 가면 돼요!";
                break;

        }
    }
}
IsOn을 만들어 주어, UI가 켜졌을 때 3초를 카운트 & 다시 꺼 주는 기능을 넣었으며, 전에 봤던 UI가 사라지기 전에 다시 다음 설명이 켜졌을 때는 지속시간을 다시 0초부터 시작하게 해 준다.
실행하면 아래와 같다.

Git Hub 주소
'유니티 > 확장 프로젝트[3D]' 카테고리의 다른 글
| 3D 미니 프로젝트 5 ] 스테이지 3 구성 및 점수 저장 (0) | 2022.09.16 |
|---|---|
| 3D 미니 프로젝트 4 ] 스테이지 2 컨셉 및 구성 (0) | 2022.09.12 |
| 3D 미니 프로젝트 3 ] 스테이지 수정 및 효과음, UI 추가 (0) | 2022.09.06 |
| 3D 미니 프로젝트 1 ] 플레이어 이동, 스테이지 기초 세팅 (0) | 2022.09.01 |
| 3D 미니 프로젝트 0 ] 계획, 플레이어 생성 (0) | 2022.08.31 |


